Performing 12-Lead ECGs EKG Module
Performing 12-Lead ECG
Tech Series
ECG Interpretation
Thomas E. O'Brien
AS CCT CRAT RMA
Objectives
Upon completion of the accompanying narrative, the student will be able to:
- Understand the importance of inspecting their equipment & the purpose of preparation prior to starting work each day
- Recognize the benefits of organizing and prioritizing daily assignments
- Understand the importance of infection control
Objectives (continued)
Upon completion of the accompanying narrative, the student will be able to:
- Explain the benefits of communication in patient care
- State the importance of proper positioning during an EKG
- Explain the importance of anatomic landmarks, skin prep and placing the electrodes accurately
- Explain the sources and significance of the different types of artifact
Lessons
Lesson #1: Equipment and Preparation
Equipment
Prior to starting work every day you should check your EKG machine to ensure the machine is working properly (turn it on and make sure there aren’t any issues with error codes etc.), inspect the cables for damage and clips for gel buildup.
Supplies
Finally, check to be sure it is well stocked to include:
- Electrodes (sensors)
- Gauze and skin prep solution (as approved by your facility)
- Razor or clippers and a roll of tape (for hair removal)
- Skin adhesive and or antiperspirant
- EKG Paper (if your machine is required to provide a hard-copy)
Preparation
- Make sure the gain & paper speed is set as ordered by the physician (standard gain - 10mm/mV & standard speed - 25mm/sec)
- An image like this indicating paper speed and gain should be seen on your 12-Lead EKG print out
- If your protocols are different, always follow them.
Lesson #2: Organize and Prioritize
Work Assignments
Check for the daily work assignments so you have a sense of the volume of EKGs to be performed and when they are to be performed. This will be dictated based upon your place of employment. Hospitals and clinics assignment of work and workload are very different. Some facilities have enough patient volume to be able to have EKG Technicians employed full time.
Lesson #3: Infection Control
Hands
Always start and end your day, before and after meals and when obviously soiled to perform a medical aseptic hand wash. Most facilities today will permit the use of an alcohol based hand rub between patients. You must always use good hand hygiene before and after all patient contact.
When I perform EKGs, I always wear gloves. You can never be too careful. I don’t want to be the source of a nosocomial (hospital acquired) infection! Plus, I want to protect myself and those I care about most.
Equipment
Another important aspect that should never be overlooked is care of your equipment. You must always wipe the EKG machine and cables down with an approved disinfectant before and after all patient encounters.
Lesson #4: Communication
Part 1
When performing the EKG on a patient it is important to first introduce yourself, then identify the patient. Tell them why you are there. “Dr. X has asked me to come and perform and EKG on you”.
Ask the patient if they have ever had an EKG before. If they have, ask them to tell you what they remember. They may remember something similar, but it wasn’t an EKG. Either way, use that to your advantage.
The patient’s participation in the procedure (even minimally) goes a long way in reducing anxiety and increasing cooperation.
Explain that you are going prepare their skin with a cold solution, then place sensors on their skin in those specific locations on their chest and limbs (perhaps in alternate locations by medical necessity or local protocol).
Part 2
Always tell the patient what you are going to do before you do it. Remind them the solution and the gel of the sensors is cold, but that it will warm up very quickly.
I avoid the use of the word “electrode” to reduce the potential for anxiety due to thoughts of electricity and shock. Instead I use the term sensor. It is a term that accurately describes what the electrode is there for anyway.
Ask the patient to reverse their gown with the opening to the front. If it is a female patient, ask her to remove her bra and provide an additional towel to be placed underneath the gown to provide additional coverage of her breasts. We do not need to see the patient’s breasts to perform an EKG!
Step outside of the room or the other side of the curtain while the patient dresses for the procedure. Ask them to tell you when they are ready.
Lesson #5: Positioning
Part 1
Traditionally the patient should be supine and well-supported in the bed. No pillows unless documented and permitted by your facility. However, many patients, especially cardiac patients may have a very hard time lying supine.
Any time you have to change the position of the patient or use additional supportive measures (pillow under the knees or head), it is important that this be documented.
Part 2
Changing the physical position may be enough to influence the shape of the cardiac complexes and make it more difficult for the physician to interpret and diagnose the patient. So, any changes must always be documented.
If there are metal side rails on the bed or gurney and it is necessary to raise them to stabilize the patient on the bed or for safety. Always make certain that there is a barrier (sheet, blanket, pillows or rail pad) between the patient and the rail.
Lesson #6: Skin Prep and Placing Electrodes
Skin Prep
Poor skin prep leads to unwanted artifact and not placing the electrodes where they should be can change the morphology (shape) of the waveforms the doctor is going to interpret.
The skin prep is as important as any other part of this procedure. A poor skin prep will yield poor results (artifact laden). Apply a moderate amount of pressure when prepping the skin.
I use a circular motion when prepping the skin. The intent of a good skin prep is to remove dirt, dead skin cells, oils, skin moisturizer, fake tan, body powder, sweat etc. All of these sources can lead to poor contact with the sensors and artifact.
Placement
Placement of the electrodes is very important when performing a 12-Lead EKG. When placing limb sensors, I prefer to stay away from large muscles due to the potential for movement and increased somatic tremor.
Lesson #7: Anatomic Landmarks I
Arms
My first option is down by the wrists. I place the sensor one handbreadth above the base of the palm of the hand. I use my own hand for this distance. This helps to ensure that the sensors are placed as symmetrically as possible. If I am unable to place the sensor there, I use the deltoid as my alternate location.
Legs
When placing sensors on the legs, I place them one handbreadth above the medial malleolus (medial ankle bone bump). Again, I use my own hand for the measurement of this distance for the sake of symmetry. If I am unable to place the sensors in this location, I will place them on the thighs if needed.
Lesson #8: Anatomic Landmarks II
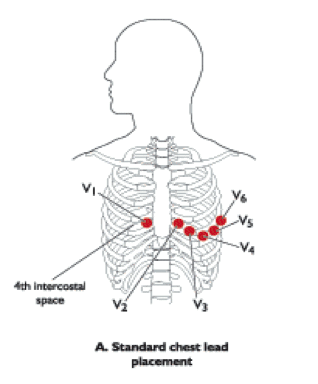
Chest V1 & V2
V1 and V2 are placed on the right and left side of sternum at the fourth intercostal space.
People use different techniques to make this determination, but I have found one that works consistently well.
I palpate at the suprasternal notch at the top of the sternum (base of the throat). From this location, I gently palpate down the sternum until I feel a horizontal ridge (about 1 ½ inches down). This is called the Angle of Louis. This ridge is where the body of the sternum joins with the manubrium (upper portion of the sternum).
The anatomic landmark is important because it articulates with the second rib. Below the second rib is the second intercostal space. Distal to this space is the third rib and space and so on.
Chest V1 & V2 (continued)
Once you have located the fourth intercostal space, this is the location that should be prepped for placement of the sensor. The V1 (right side) and V2 (left side) locations straddle the sternum. One on each side. When the sternum stops and the intercostal space begins, this is where you place each sensor.
People who just “eyeball” and put the sensors any old place will never have consistency of sensor placement and diagnostic tracing quality.
Chest V3 & V4
V3 is skipped and placed between V2 and V4 after V4 is placed.
V4 is placed in the fifth intercostal space in the mid-clavicular line.
Chest V5 & V6
V5 is placed in a direct line with V4 at the anterior axillary line (front of the armpit).
V6 is placed in alignment with V4 & V5 at the mid-axillary line (middle of the armpit).
If the sensors cannot be placed in the usual locations, be sure to document the alternate location and why they were moved i.e. burns, surgical dressings, chest tube etc.
Lesson #9: Anatomic Landmarks III
Diagram
Adjustments
Another common reason for adjusting sensor placement are large breasts or patients with breast implants.
In instances where the sensor will not lay flat (cleavage), you may need to move the V1 and V2 sensor as high as the second intercostal space
You may have to elevate the head of the bed as well to allow gravity and natural movement of the breasts downward to make your job easier.
Either way, if this is necessary, it is important to document the new location for V1 and V2 and the elevated head of bed and why you made those modifications to placement and position.
Lesson #10: Cables
Part 1
Now that the sensors are in place, bring the cables to the patient and run them up the patient’s mid-line.
Separate the limb cables from the chest cables to reduce tangling them up on top of the patient.
The cables must lie flat on the patient, they must be contained within the body and not put any stress on the sensors.
Part 2
Any slack in the cables may be taken up by making gentle loops in the cables. Cables that hang off the patient are susceptible to EMI (electromagnetic interference) and can be a source of artifact.
Clip the cable clasps to each appropriate sensor. Double-check each attachment before you run the EKG to ensure good connections i.e. the sensors are not peeling up or dimpled and to make
Lesson #11: Running the EKG and Artifact
Running the EKG
There are many manufacturers and models of EKG equipment in the field. You must refer to the equipment you use at your facility for operating instructions. Some machines have an EKG or Run button others have a 12-Lead button.
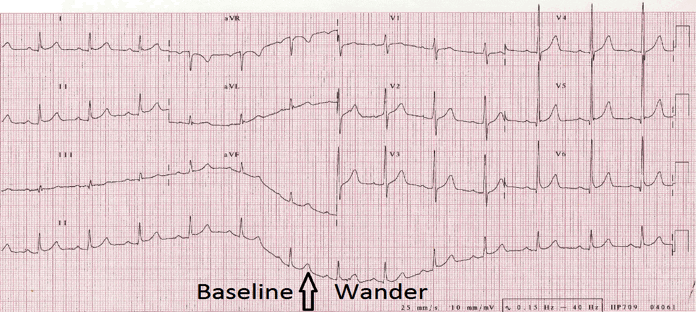
Wandering Baseline
Once the machine has printed the EKG, or it is viewed on the screen prior to printing. Inspect the image for artifact.
A wavering baseline is often referred to as wandering baseline, and it is often caused by poor skin prep or breathing in some instances.
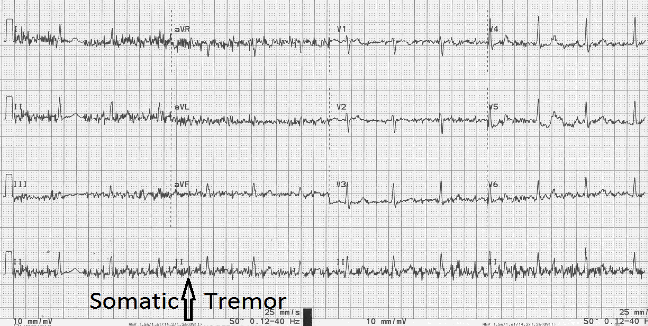
Muscle (Somatic) Tremor
Choppy interference throughout the tracing is often caused by patient movement, even shivering or chewing gum can cause artifact known as somatic tremor.
If your patient is anxious or cold, try giving them a nice warm blanket. I have seen this work countless times.
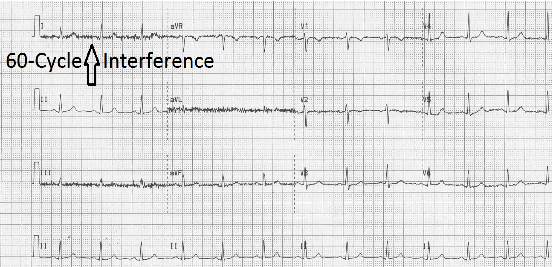
Electrical Interference
Tight rapid oscillations seen in the tracing which looks like a caterpillar (thick and fuzzy) is a type of interference called 60-cycle or AC interference. This is electrical interference that may be caused by power cords, lighting or electrical wires in the walls, ceiling and floor. In a case like this, try to figure out the source of the problem. You may have to turn off the lights or move a power cord or in some cases change the angle of the bed (45 degrees has worked for me).
Make sure the patient is not wearing a cell phone or other electronic device and that the patient cables are within the confines of the patient.
This patient had a cell phone in their left hand.
Lesson #12: Completing the EKG
Equipment
Upon completing the procedure, remember to throw away any trash, return any equipment or furniture moved, return the side rails and bed to its original position and wash your hands.
Clean
Clean and return the EKG machine for proper storage. Re-stock as necessary.
Documentation
Make sure the completed EKG has all the required documentation on it and the doctor’s order is signed off when you are finished.
Make copies or transmit as required by facility policy.
Authors and Reviewers
- EKG heart rhythm modules: Thomas O'Brien
-
Medical review: Dr. Jonathan Keroes, MD
- Medical review: Dr. Pedro Azevedo, MD, Cardiology
-
Last Update: 11/8/2021
Sources
-
Electrocardiography for Healthcare Professionals, 6th Edition
Kathryn Booth and Thomas O'Brien
ISBN10: 1265013470, ISBN13: 9781265013479
McGraw Hill, 2023 -
Rapid Interpretation of EKG's, Sixth Edition
Dale Dublin
Cover Publishing Company -
EKG Reference Guide
EKG.Academy -
12 Lead EKG for Nurses: Simple Steps to Interpret Rhythms, Arrhythmias, Blocks, Hypertrophy, Infarcts, & Cardiac Drugs
Aaron Reed
Create Space Independent Publishing -
The Virtual Cardiac Patient: A Multimedia Guide to Heart Sounds, Murmurs, EKG
Jonathan Keroes, David Lieberman
Publisher: Lippincott Williams & Wilkin)
ISBN-10: 0781784425; ISBN-13: 978-0781784429 -
ECG Reference Guide
PracticalClinicalSkills.com